Todays post will focus on sculpting a large collected Crepe Myrtle that was dug up during a landscape job a couple of years ago. Sometimes the guys that work for me will get it in their head that something will make a good bonsai, so they'll bring it back to the nursery. This is the story of one such "rescued from the dump "tree. It's usually something big and this is no exception. As you can see in the first photo there is not too much that suggests this material would make a good bonsai. This is approximately a year and a half after being dug up. The tree is obviously recovering well. As you can see though the trunk is just a massive piece of wood with no movement and not a lot of taper. It does have the typical multi colored muscular looking bark that adds interest to the tree, as well as pretty pink flowers.
Having reduced the height and removed a lot of growth the tree is still hidden.
There still isn't much to recommend this as a bonsai. It does have a very strong root base, it's large and it flowers but at this point that's about it.
After a little more branch pruning it still doesn't look like much more than a log with some branches. There are two major chainsaw cuts that need to be dealt with somehow and then we need to figure out a way to add some interest to that big straight trunk.
What to do? I decided at this point to put the tree back in the not for sale area let it grow some more and deal with it later.
Now its several months later and time to do something with this tree. It'll never be a bonsai if I do nothing so I don't have anything to lose by trying. The only solution I can see is to try and create some interest by carving and sculpting the trunk. Doing so will not only disguise the large chainsaw cuts but hopefully add some new dimensions to the trunk to take away from the "loggyness" of it.
First using a piece of chalk I outlined the areas that I plan on carving as seen in the photos below.
This is my initial plan for dealing with the chainsaw cut.
This is - for now - the proposed front of the tree.
And the other side of the base of the tree.
Below are some of the power tools and bits to be used for the carving.
Starting from the top - a variety of carving bits. A pair of safety glasses - the #1 item to have before doing any type of power carving. A couple of different brands of electric die grinders. A large disc with carbide cutters on a 3" grinder used for fast heavy stock removal. And an Arbortech minigrinder.
Above is a closer look at some of the carving bits and below is a close up of a new to me carving bit from England that really eats up the wood. It has a much longer shaft then the bits I'm used to.
Starting with the big disc on the grinder I go in and do the initial large removal and basic roughing out of the areas to be carved.
As you can see the chips are really flying which is why safety glasses are so important.
Then, using a variety of bits, more wood is removed and shape is added.
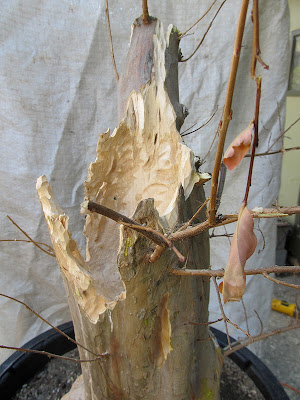
Working on hollowing out the trunk and hiding the chainsaw cut.
Seen from the other side.
Working on the two cuts at the base and adding interest to the lower trunk.
The initial roughing out of the upper hollow.
Using the different bits more shape and texture is added.
Tool control is vital - they will get away from you if you're not careful. The gouge on the far left of the center cut was not planned, the tool got away from me for a second. Since it's there I need to make it part of the design.
For now the carving is finished. This is really just the rough block carving . The tree will be put away and fertilized heavy for the next several months while the foliage starts to develop. During that time the newly carved wood will start to weather and harden. Sometime probably this summer we will start the finer more detailed carving that should hide the tool marks and make the whole thing look more natural. Hopefully by the end we can develop an image of a tree devastated by time and the adversities thrown at it by nature but still growing and surviving in spite of all that. I hoping for it to look like an old hollow trunk tree when it's done. I think the contrast between the old rough trunk and the soft pink flowers will be amazing in the future. Only time will tell. Here is how it looks now from all sides.
This was originally to be the front, now I'm not so sure.
This will probably wind up as the front.
So for now the tree can rest and grow. We'll see what happens in the next round later this year.
I hope you enjoyed today's post. I'd love to hear whether you think it has a future as a bonsai or a fire log. Let me know. Until next time...


