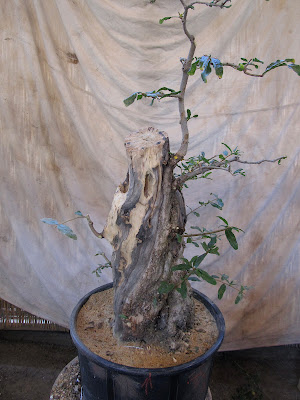
Today's post is going to show the first steps of carving a giant pomegranate cutting. It is 6" across the base at the soil line and 23" to the tip of the apex.
In January of 2009 this was a section of a pomegranate trunk that we were removing as part of a garden project. It already had a large deadwood area but enough of a live area that I thought it might take. It was basically a stump with a couple of small branches. The first year it budded quite a bit from all the live areas. I let it grow unchecked the first year, reduced the number of branches and let it grow and cut it back a couple of times a year since then. Now it's time to start the transformation into a bonsai.
Here are some shots of the tree from all four sides prior to todays work.
Tentative front
Right side
Back
Left side
The first thing I have to do is to remove unnecessary branches and to shorten the remaining ones so that they are not in the way of the carving. This tree seems to sprout new buds from old wood pretty easily so I don't really need to worry too much about the branching at this stage.
Here is the tree after the pruning. There are pretty much all the primary branches necessary to frame the trunk which is going to be the main point of interest of this tree. The carved ancient looking trunk, and in time, the winter silhouette are going to be where the eye concentrates on this tree.
You'll notice that a little more than half way up the trunk there is a bulge that causes some reverse taper. This will be one of the things I correct with the carving. I also intend to add taper to the trunk and make it look like an old hollowed trunk tree out in an abandoned field somewhere.
I'll start out by creating the profile of the tree. Reducing where needed, opening holes and creating spaces using a variety of tools and bits. I'm not going to worry so much about the finish or even too many details at this point. This first step is to get the major block carving and wood removal done.
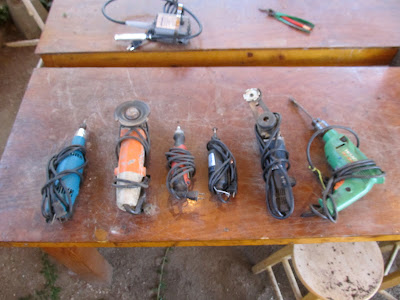
Here are the tools laid out and ready for duty.
I'll start off with the Makita and a tungsten carbide rotosaw blade to start to remove excess wood and put movement in the trunk.
After a few minutes with the rotosaw.
After several minutes with this tool, dramatic results can be seen. Extreme care and control is necessary because this tool can do quite a bit of damage if allowed to get away from you.
Next I'm going to switch back to the Makita, this time with a tool imported from Europe that has a small disc with cupped cutters mounted on a fairly long shaft. This is used for creating grooves, removing quantities of wood and hollowing out areas. It's very useful for cutting into the trunk and creating holes while maintaining the outer layers of wood.
Stay tuned for part two. As always I look forward to any comments or questions.
Thanks again for reading.


