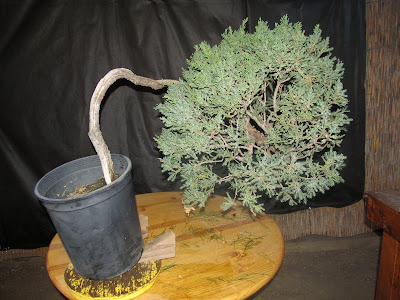
It was an old skinny San Jose in a long drawn out C shape with the only foliage at the end of the tree. There are two life lines on either side of a shari that runs most of the length of the tree. There's also a break in the shari. Here is what it looked like when I got it.
Here's a detail of the shari and the break. Notice the checking and cracking in the shari -this really shows the age.
have a good root system so I did not want to put it in too big a pot for fear of root problems. Sometimes if there is too much soil volume the roots cannot use as much water as the soil will hold which can lead to root rot. So I planted it in this round pot.
Not really a good choice but it was handy. The tree had to be kept tied down to the shelf while it was in this pot because it was unbalanced and wanted to fall over.
In spring of 2011 I decided to select branches and wire them into position for the first time. By setting the pot inside a nursery can I was able to change the plant's position and not have it fall over.
After this I pretty much let it sit for two years. I lightly pruned it and fed it but that was about it. I wasn't really satisfied with the way it was looking and felt there was a better tree in there - I just couldn't find it yet.
This spring my teacher Kenji Miyata was at the nursery and saw the tree. He said we should bend it and make it more compact. Bend it?!!! There was 20+ year old deadwood running most of the length of the trunk! My reaction was that it was impossible without breaking the tree in half. He said bring it to the next class and we'd do it.
In early March I took it to Kenji's class to work on. Note the length of the trunk and the distance of the foliage from the trunk.
The first step was to wrap the trunk tightly and thoroughly with raffia. It
is important to be sure there are no gaps in the raffia. Each wrap should overlap the last.
After the raffia I laid a piece of large gauge 5mm aluminum wire. I used a couple of little raffia ties to hold it in place.
Then again I wrapped the entire trunk with another layer of raffia, being sure that it was tight and that there were no gaps. On top of this I wired the trunk with two pieces of 6mm wire. The initial bend was made, then an anchor wire was placed so the crown could be pulled in towards the trunk.
Then using anchoring wires and a turnbuckle we started moving the crown up as well as in.
Here is how much we were able to bend it! The bending was done slowly, feeling and listening carefully for any breaks. We didn't feel or hear any cracking at all, much to my surprise. We were able to get quite a bit of movement in the trunk.
In the beginning of April I transplanted it into a cascade pot. This won't be its final pot but it'll do for the next couple of years while the foliage develops.
Again the tree hardly seems to have skipped a beat. There are plenty of new strong growing shoots. In the next few weeks I'll wire all the branches into position.
I hope that this post was informative and helps you to try something a little outside the box. As always I look forward to any comments or suggestions for future topics.


