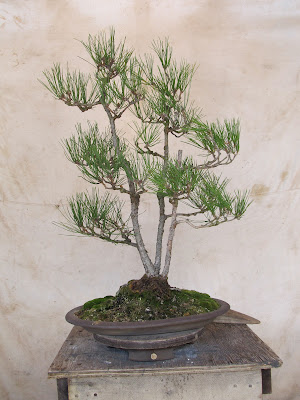
I was attracted to it instantly. It isn't too usual to find a triple trunk pine especially with slender trunks like this and it called to me from the moment I saw it. Since as a member I had a chance to preview what was for sale I decided that to be fair I would wait 5 minutes after they openned the gate to the public before buying it. A couple of people looked at it and I was regretting being nice for a second, but lucky for me they passed it up. As soon as the 5 minutes was up I bought it.
What I saw in this tree was a 3 trunk bunjin style pine. It's not usual to see mutliple trunk bunjins. Bunjin style trees are usually fairly thin and tall and have less foliage compared to the other styles, but more important are the feelings they invoke. For me a bunjin or literati sytle tree has to have a simple elegance and impart a subtle feeling of age, strength and perseverance. Styling wise the emphasis is on the shape of the trunks and usually sparse amounts of foliage. I think we can get the styling part down fairly quickly, but it will take more time in a pot to fully develop into a true bunjin.
Here's the tree before doing any work to it. This was the front.
I felt there was a better front so after getting dizzy from turning the tree so many times I decided that this front was one. I also decided that it needed a little change of angle.
Once I picked the front the next step was to clean up the tree and remove the old needles.
I also thinned out buds in areas where more than two buds grew back from last years candle pruning. Here it is after the clean up.
The next step is going to be to get some more movement into the trunks-specifically the two smaller trunks. To protect the tree and to allow me to bend the trunks with a large degree of safety the trunks were wrapped with raffia. The most important thing when using raffia is to be sure that there are no gaps in the wraps. Any areas that have gaps in them are much more likely to break, so be sure that all your wraps overlap the previous ones. Then a copper wire was placed on the trunk. I usually use aluminum but copper is stronger so I could use a smaller less noticeable wire to hold the bends in the trunk. Aluminum wire strong enough to do the same job would need to be almost twice as big.
Here is a close up of the base showing how the bark is starting to show some age and character. Aging of the bark is one of the things we have little control over. It mostly time that will do it. When the entire trunk looks like this ( about 10-12 more years) then the tree will really have the character to be a really good bunjin.
After applying raffia and wire to the trunks it's time to wire every branch. I spent about an hour or so wiring then I placed the branches in the desired position and put some subtle movement into the trunks. I'm pleased with the results so far. This spring I'll transpalnt this either into a rustic shallow round pot or possibly on a stone slab. Here is the result of the work to this point.
I hope you enjoyed todays post. As we come to the end of this year I want to take a minute to say thanks to each and every one of you who read these post and to wish you all fantastic holidays and a happy, healthty and prosperous new year.


This reminds me of trees you see in Japanese paintings.
ReplyDeleteThanks. Japanese and Chinese paintings are one of the main inspirations for this style. If looking at this makes you think of them, then that makes me very pleased.
ReplyDeleteCiao
ReplyDeletehai fatto un ottimo lavoro.
Complimenti davvero .
Debby