One advantage of forest plantings is that you can make use of trees that might otherwise be unsuitable for bonsai. Young trees, trees with defects such as no branching on one side or with poor nebari can all find a home for themselves in a forest planting. You can use more developed trees as well. It is important to have a large number of trees to choose from . They should have varying trunks sizes and heights. Many different kinds of trees can be used in forest plantings. Usually only one species is used, although if done carefully, mixed species can be used. Deciduous trees are more commonly used but conifers and broad leafed evergreens can also be used. There are no rules about the proper number of trees to use,though usually it is an odd number and more than five trunks. Forest plantings are also very dramatic and fascinating to people.
The trees we are using are Celtis sinensis commonly called hackberries. They are similar to elms in many respects and are tough, forgiving trees. They are fast growing and develop good ramification in a short period of time. They easily reduce leaf size and lend themselves to cultivation as bonsai. One drawback is that they tend to lose some finer twigs over the winter, but these are easily replaced.
The plan is to use 23-27 Hackberries of various sizes and ages planted together in an old Japanese pot. These are all cutting grown trees that range in age from 2 years to 10 years for the oldest tree.
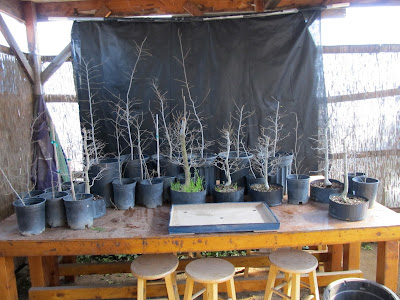
Here are the trees and the pot before any work has been done.
As you can see in the above image even these fairly undeveloped trees already have decent branching, although we will be cutting most of the existing ramification off.
The next step will be to prepare the trees. The heights of all trees needs to be chosen and all of them trimmed. The trees need to have varying heights with the number one tree having the biggest trunk and being the tallest. At this stage we are not too concerned with branching on the trees. We'll concern ourselves with creating new apexes. by pruning to a new branch or bud that can take over as the new top of the tree. Doing this not only gets the trees to the proper height by also creates and adds taper. In some cases we needed to use wire to bring a side branch up as a new apex. Our initial concern is going to be establishing trunk lines and getting all the trees into the pot. As the planting grows the branching will develop very quickly. In order to do this I fearlessly cut back not only the heights of the trees but most of their branches as well. Here are the trees after the initial pruning and a little wiring. One note since these are fast growing trees the wire needs to be checked frequently to avoid scaring.
At this stage we are done for now. The next steps will be reducing the root balls and getting the trees placed and planted. That will be the focus of part two, in the next day or two.
As always I welcome any thoughts or comments on todays project on on subjects you'd like to see in future posts.


Did you continue this project? It looks really interesting and I'd love to see how it turned out!
ReplyDeleteThis comment has been removed by the author.
ReplyDeleteThanks. Yes I did you can find the second part here.
ReplyDeletehttp://bonsaibpsbonsaiblog-bonsai.blogspot.com/2011/02/creating-forest-planting-part-2.html#comments
And a third here
http://bonsaibpsbonsaiblog-bonsai.blogspot.com/2011/05/hackberry-forest-revisited.html#links