Lets go over the tools I'll use today-
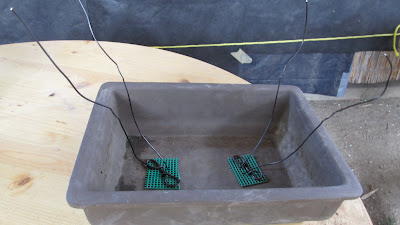
Before we start on the tree we need to prepare our pot. First wash it well. Then we place plastic mesh over the holes in the pot so we don't lose soil. We secure these screens using U-shaped wire clips made from leftover bits of wire. We also place two wires for tying the tree into the pot. Here is the pot ready for the tree.
The next step will be to remove some excess branches and to reduce the deadwood in the wound from the large trunk cut. Doing this will help the scar tissue to close over the wound quickly and neatly. After 4-5 years there should be almost no sign of the scar. Using a small rotary tool with a carbide grinding bit allows me to carve through the deadwood quickly and cleanly.
After a few minutes we've removed enough wood for the cut to heal over without causing a bulge in the trunk later. The branches just under and on top of the cut will help speed up the healing process.
After the deadwood carving and branch removal we're ready to start the root work.
We gently take the tree out of the nursery pot without disturbing the root ball too much.
Next gently scrape away the soil on top of the rootball to expose the nebari (where the roots and trunk meet the soil). We'll comb out any roots crossing over each other and arrange the roots so they radiate from all around the trunk. The roots on this tree are fairly fine since its only been one year since digging. Then we start combing out soil from the rest of the rootball, untangling roots as we go along.
Then trim off any heavy or overly long roots until you're left with a nice compact system of fine roots. Since we cut off about 50% of the foliage that was on the tree we're safe removing almost as much root.
Next we place a mound of soil in the pot right under where the the base of the trunk will be placed. Usually just slightly off center.
Then place the center of the tree on top of your mound with the roots spread out radially, and push it down onto the mound of soil. You really want to work it in there so it sets firmly on top of the mound.
Pour on a scoop of your soil mix and using the chopstick and your fingers work the soil into the roots, being sure to fill all pockets and voids. Use the chopstick to feel for and find those voids then push soil into them with your finger. Keep doing this and adding soil as needed to fill the pot.
After the tree is fairly well set in the pot and the roots covered with soil, use the tie wires to securely tie the tree into the pot. This is done to anchor the tree into the pot so that there is no movement that may damage the fine roots as they develop. It also helps keep the tree and pot together in case of an accident or heavy wind. After the roots start to fill the pot they will secure themselves, and the wires (if visible) can be removed.
Finish adding soil and working it in until all voids are filled - the tree should not move in the pot at this point. Use the potting trowel to tamp down the soil to below the rim of the pot to prevent water from just running off.
After all the soil is tamped down, clean any excess soil of the roots and smooth out the surface of the
soil.
Water thoroughly until the water is running out of the drainage holes clean as fast as you're pouring it in.
Finished with the transplanting and sitting happy in it's new home
I hope you found this post educational and enjoyable. As always all comments or suggestions are welcome.
Stay tuned for a couple of exciting long term projects that we'll chronicle step by step. One will be an old juniper in a 15 gallon nursery can and the other will be an overgrown 10 foot tall redwood in a nursery can. Over the next year we'll follow their progress on the journey from plant in a pot to a bonsai or bonsais in the case of the redwood.


Beautiful tree! Great step-by-step illustrations and instructions. This was very helpful to read. It reminded me of some details I have forgotten over time. Thanks Bob!!
ReplyDeletePA
You're welcome.
ReplyDeleteMuy buen post. Muchas gracias.
ReplyDeleteSimple Torsion
this was a massive help. some good information thankyou
ReplyDelete